One day end of 2015 I stumbled upon some pretty kewl voxel art by Metin Sevin. Amongst many others like Mario Bros, Pacman, or Donkey Kong, I was immediately fascinated by the 3D rendered Bruce Lee Commodore 64 game tribute picture. I contacted Metin and asked him if his work is for sale and he kindly pointed me to society6 where a lot of his art is available in various formats. If you are interested in Metin and his work you can find out more in this interview at the end of this blog post. Due to some other planned projects based on Ikea Ribba frames I had one 23x23cm frame on stock so the 8″x8″ Bruce Lee art print would fit just fine. Shipment from Illinois/USA took about two weeks and I was ready to go for my art project!
tl;dr Watch the video to see what this project is about. Making of with gory details below video.
Project Description
Take the 8″x8″ Bruce Lee art print and put it in a 23x23cm Ikea Ribba frame. Use an Arduino to play the C64 Bruce Lee game title music at 12am and 7pm. Announce every hour starting with the first 3secs of Carl Douglas’ Kung Fu Fighting song and indicate the current hour by an according number of Yamo’s calls (the green Sumo in the game). Announce a quarter past, half past, and a quarter to with the Ninja’s stick strike sound ringing out once, twice, or thrice, respectively. Finally, add a capacative touch sensor to cycle through all Bruce Lee game sounds by touching one corner of the Ribba frame.
Payload
1 x 8″x8″ Bruce Lee art print from society6.
1 x RIBBA frame from Ikea seems no longer to be available. You could use a 25×25 cm Sannahed frame as a replacement.
1 x Visaton K28.40 8Ω, Price comparison idealo
1 x Arduino Nano e.g. from eBay
1 x LM386 Audio Amplifier Module e.g. from eBay
1 x DS3231 Real Time Clock (RTC) e.g. from eBay
1 x CR2032 battery for DS3231 RTC
1 x SD Card Module e.g. from eBay
1 x SD Card 1GB is sufficient
1 x 5V 1A power supply
Cables, solder and iron, hot-melt gun, screws, (cordless) screwdriver, drill, side cutter, etc.
A 1GB SD would have been sufficient since the WAVE files are very small. Unfortunately, I threw away old small capacity SD cards years ago “…when should I ever need a one or two GB SD card again?” Well, now I know the answer. Thus, I had to use an 8 GB SD card.
Audacity will be helpful to recode the Bruce Lee tunes to the required format.
Howto
Order the Bruce Lee voxel from society6. Wait approximately two weeks until it arrives; might heavily depend on where the item is shipped to. 😉 While waiting: a] Buy a 23x23cm RIBBA frame at your local Ikea. b] Prepare the necessary electronics and code to get the thing up and running.
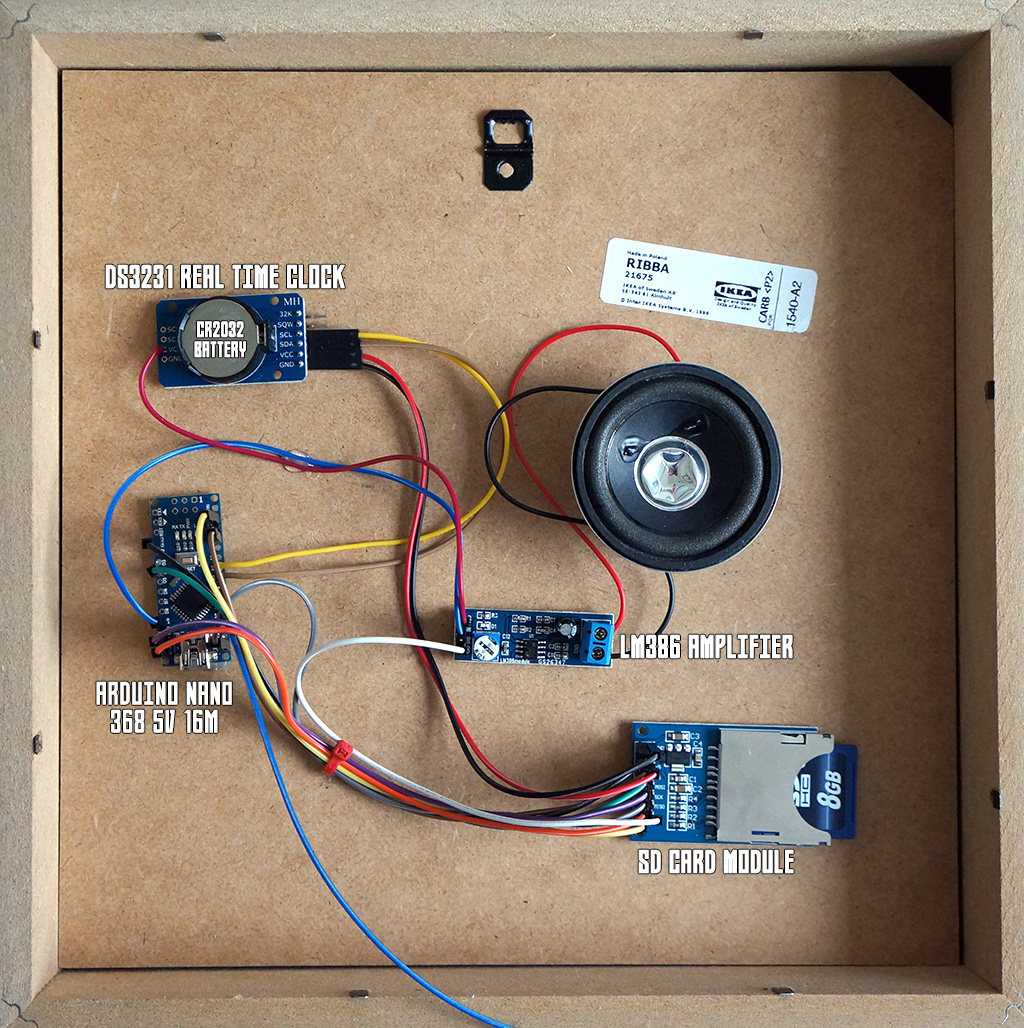
Hardware
For the hardware part: Glue the required components, i.e. Arduino Nano, amplifier, SD card module, DS3231 RTC w/ CR2032 battery to the back of the RIBBA frame. It might look like this.
NB: This was my first shot with the loudspeaker directly glued to the backside as can be seen in the photo. My assumption that the – sort of abyssal – RIBBA frame will act as a good resonator
WAS WRONG. When I hung up the picture on the wall for the first time you could barely hear anything. The loudspeaker radiating directly to the wall was nearly completely muted since the sound waves cannot escape the frame.
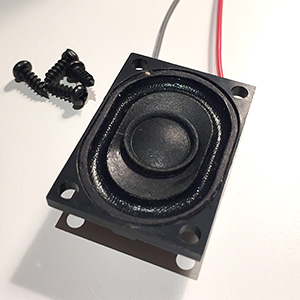 New solution: Drill a plethora of holes into the bottom part of the frame and attach a (smaller) loudspeaker so that its sound waves can go through the holes. There are roughly 3 cm space between the backside (with the components) and the wall-facing side of the frame. Thus, I needed a speaker with a radius of max(3cm). I found an fairly good sounding 2,8x4cm rectangular-shaped speaker from Visaton that would fit snuggly into the available space (cf. picture).
 I created a drill template with the speaker’s exact dimensions by laying a piece of paper on top of it and tracing its contours with a pencil. Old school but works! After that I drew a mesh pattern with a lot of drill holes. That could have been the maiden trip for my drill press…but I went with the cordless screwdriver that did a nice job on drilling the 90+ holes. The template was fixed with sticky tape to the frame before drilling. I covered the whole template with tape to avoid frayed drill holes. This worked pretty good on the template
 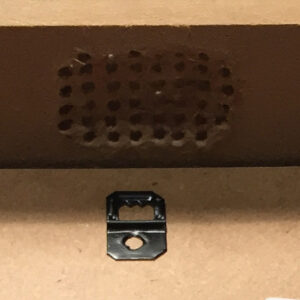 side but not on the inside of the frame. The RIBBA frame is made of chipboard so I lost quiet some material while drilling. You can see in the picture that the inside is not flat anymore but sort of curved due to the lost material. Next time I would apply sticky tape to the inside too.
 The holes needed some afterwork, i.e., burring and removing frayed pieces. The pictures do not show the final stage of afterwork so you will have to trust me that the result was ok. Especially, since the holes are on the bottom side that will, most likely, hardly been seen or looked at when the frame is hanging on the wall. I was happy with the result and moved on to screw the Visaton speaker into the frame with four black and tiny flat-head screws that were giving me a hard screwing time.
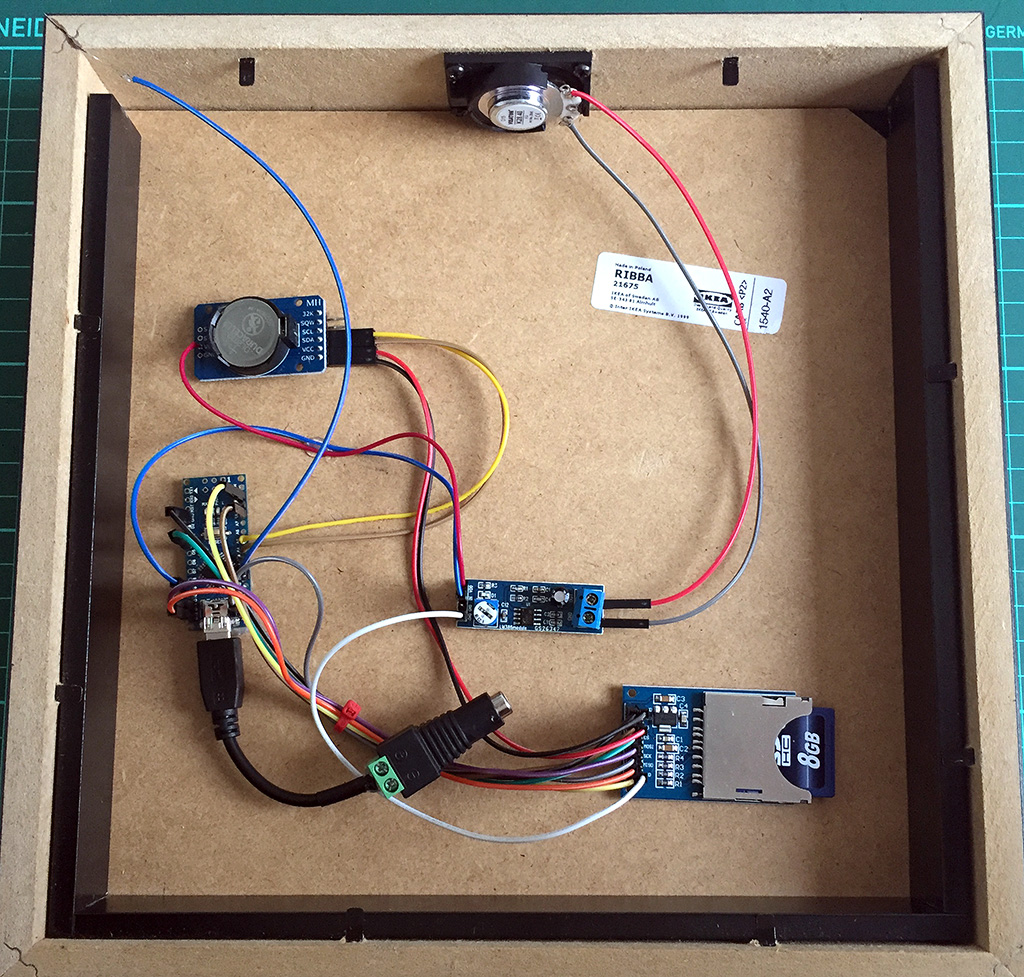
This is how the final setup looks like.
Note the blue cable going to the upper left corner?
This is the capacitive touch sensor wire. 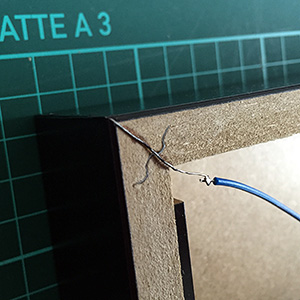 It is basically a piece of zinc coated copper wire bent to a 90° angle and sticked exactly to the corner of the frame using super glue. It was then painted black and soldered to the blue cable to have it connected to the Arduino. With this switch I would later be able to play all Bruce Lee game tunes one after another by repeatedly touching the bottom left corner of the frame. Actually, the ADCTouch-Library used is doing such a great job that the Arduino can react to a finger (or a hand, or some other body part) just coming near to the wire. You can measure changes in the wire’s capacity without even touching it. Awesome!
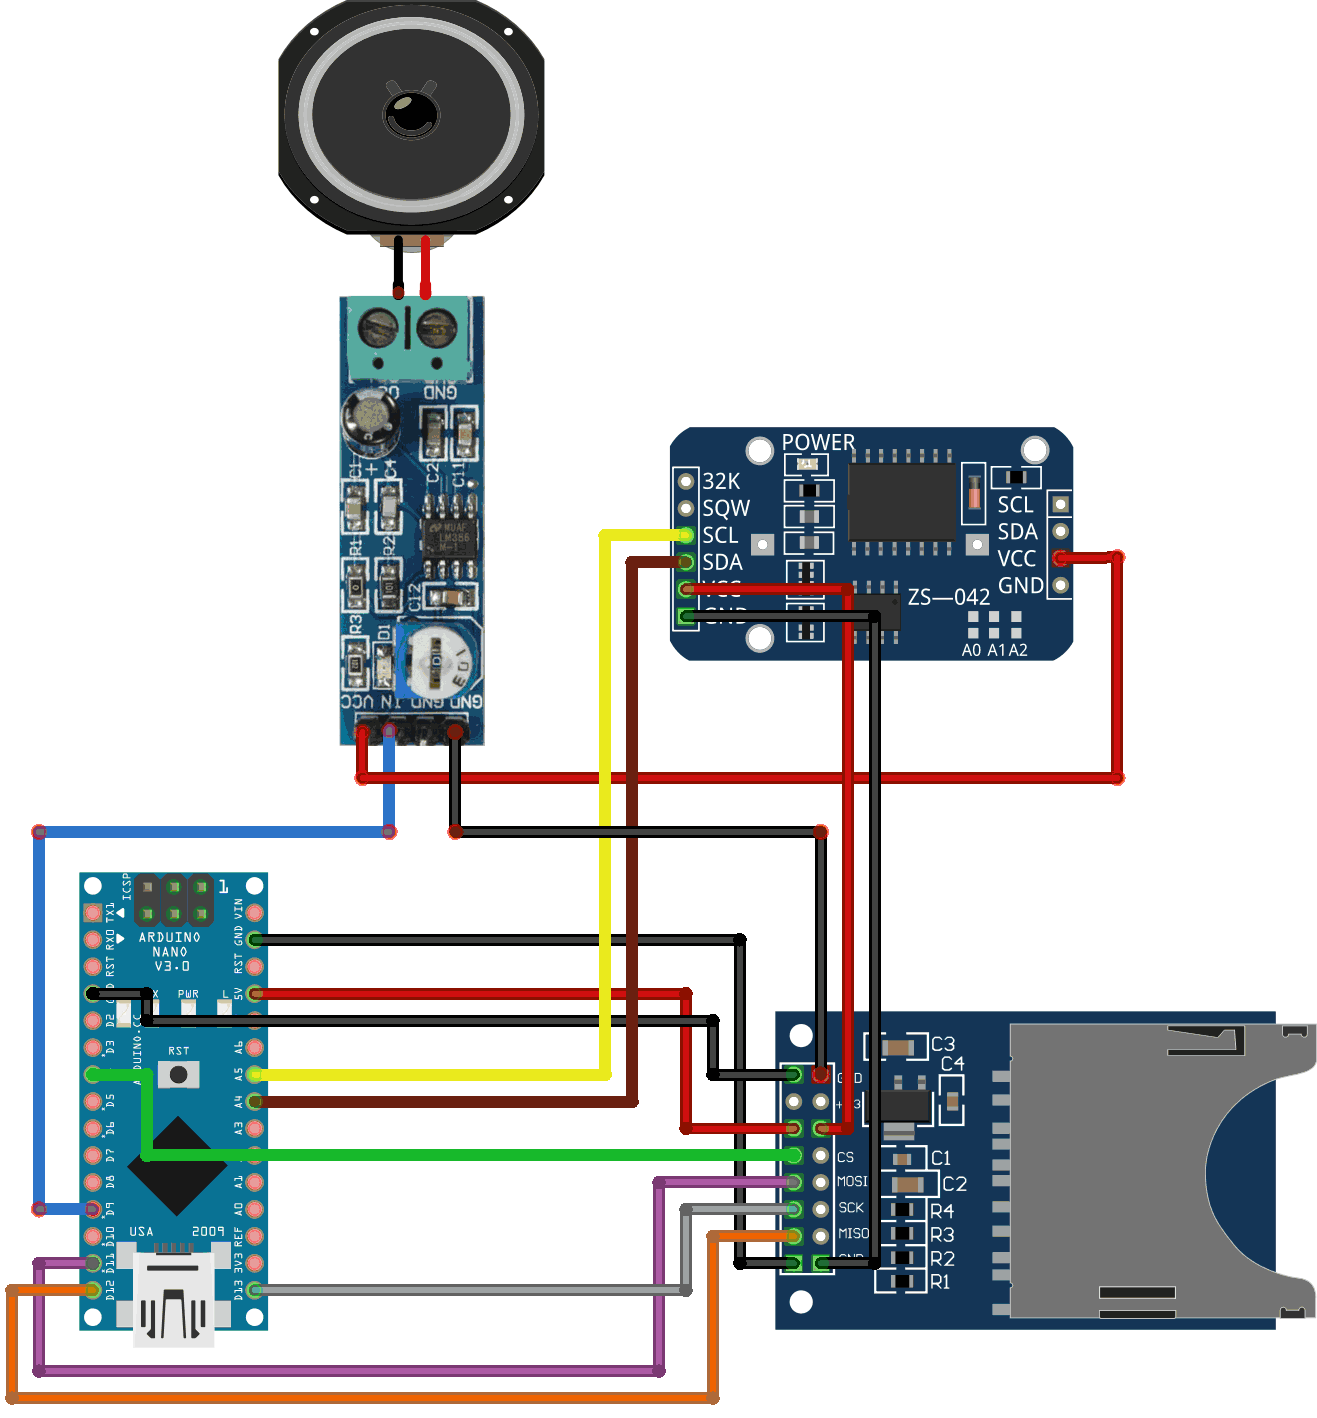
What’s missing? Yes, details on the wiring. The correct wiring might be hard to find out by just looking at the pictures, not least since my wire color scheme is a bit, eh, inconsistent. So here’s a Fritzing breadboard view of the wiring.
That should cover the most important aspects of the hardware. But all this hardware is nothing without software. Let’s move into the matrix.
Software
Code is poetry
There are more lines of code in the Arduino sketch (GitHub) than needed to implement the behaviour as described in the Project Description. Nonetheless, some of the code is helpful for debugging purposes and some other for fiddling with the TMRpcm Library.
This library is used “for asynchronous playback of PCM/WAV files direct (sic!) from SD card”. The WAVE files must be in a specific format, i.e., 8-bit, 8-32khz Sample Rate, mono. Thus, do not expect Hifi quality! I wrote a separate article WAV-Dateien von SD-Karte mit Arduino abspiele where you will find the gory details about the required file format, how to convert, e.g., an mp3-file using Audacity into this specific WAV-format, how to format the SD card – if required, how the WAV-files have to be named on the SD card (8.3. SFN – short file name from the good ol’ MS-DOS times), and a short Arduino sketch to test the TMRpcm lib.
The ADCTouch library is required for utilizing capacitive touch sensors without any additional hardware.
Debugging with “Serial.print()” is not that funny so we’re using the Streaming library to provide a C++ like << operator that allows constructs like Serial << F( "Current volume is " ) << gVolume << "." << endl; which is very convenient. NB: With the macro F() you put strings in an Arduino's flash memory instead of the sparse static RAM (SRAM) leaving more space for variables and such. The ATmega328 chip found on the Uno has the following memory:
Flash  32k bytes (of which .5k is used for the bootloader)
SRAM   2k bytes
EEPROM 1k byte
Flash is plenty but SRAM isn't - so there is reason to always save SRAM!
Finally, we need the DS3232RTC and Time library to handle the real time clock. Europe will not let go of the daylight saving time (DST) idiocy. Summer time is switched on at the last Sunday in March where 2 o'clock becomes 3 o'clock. Vice versae at the last Sunday in October where 3 o'clock becomes 2 o'clock. We have to recognize the DST so the Bruce Lee cookoo works both in summer and winter. 😉 Thanks to user "jurs" from the German Arduino Forum we have a great European daylight savings time calculation function fIsSummertime() that returns "true" when we're in summer time and false if not.
The Arduino sketch
Sketch also available on GitHub in the RIBBAttacking-Bruce-Lee repository.
Interview with the artist
Metin and I had a nice e-mail-chat while the project was ongoing. There are quiet some analogies in our CVs like being born in the 1970s, growing up with 8-bit computers, adjusting the datassette's azimuth with a screwdriver, hanging out at arcade halls, and - of course - liking minimalistic pixel graphics. Here is short interview with Metin to get you in touch with him as a digital artist and his voxel creations.
Metin, who are you?
My name is Metin Seven, I was born in the 1970s, and grew up in the 1980s with the first 8-bit and 16-bit generations of game consoles and 'home computers', particularly the Atari 2600, CBS ColecoVision, Commodore 64 and Commodore Amiga.
What is your artistic spectrum, i.e., what kind of art do you make/prefer?
I'm a die-hard digital artist. I used to draw on paper as well, but I prefer the flexibility of the digital screen. I started creating pixel art for Amiga demos in the late 1980s. That soon evolved into creating pixel graphics for commercial games, television commercials and children's animation series in the 1990s, all done using software like Deluxe Paint and Personal Paint on an Amiga. Since the late 1990s I've shifted towards 3D graphics creation, but pixel art will always keep a special place in my heart.
Why retro games and what is your reference to this genre?
Ever since I was a little kid I was enchanted by the magic glow of the digital screen. I used to hang out at arcade halls, playing the first 8-bit games, such as Donkey Kong, Lady Bug, Pac-Man and Pengo. When I was not playing them myself, I could stare at people playing the games for hours. The first pixel graphics had this pure, iconic quality because of the low resolution restrictions for sprites and such. It's great to see that atmosphere return in the current wave of minimalistic pixel art games for mobile devices.
Did you have decent experiences with the C64?
Definitely. During my school days I spent just about every afternoon and evening playing Commodore 64 games, first loading them using the Datassette tape recorder, adjusting the azimuth when necessary. After a while I bought a floppy disk drive. LOAD "*",8,1 😀
How did you come to create voxel pictures? Where does the idea come from?
During the 2000s I created a lot of stylized 3D illustrations for printed magazines and newspapers. My use of shapes and colors reflected my game pixel art background, and gradually my illustration style became more elementary, until I arrived at a point that fully made sense — a blend between pixel art and 3D artwork: voxels. It was then that I decided to start paying tributes to my childhood love: 8-bit and 16-bit games.
Can you tell us something about the voxel creation process?
My first voxel images were created in 3ds Max in the mid-2000s, extruding blocks of quadrangular polygons. That was quite a hassle, and I was eager to find a dedicated voxel editor. I found that in the shape of Paint3D for Windows. I got in touch with the coder and suggested a number of features, which he kindly implemented.
When I switched to Mac OS X in 2014, I started using Qubicle, also a versatile voxel editor. I guess MagicaVoxel would be the tool of my choice today, but to be honest I've become a bit saturated when it comes to voxel creation, although there’s a good chance I'll return to it some day.
Where should we go if we'd be interested in more from you?
The best starting place is my portfolio site metinseven.com, there you will find links to my online shops, offering 3D prints, 2D art prints, stock 3D models and stock illustrations.
Many thanks for this interview, and my sincere compliments to you regarding your clock creation based on my voxel tribute to the classic 8-bit Bruce Lee game.
The pleasure was all mine! Keep on the good work!

i.f.
Top job! Love it! 🙂
[…] Beispiele: 1) Großartiges Bruce Lee Kunstprojekt, bei dem ein Ikea RIBBA Rahmen als Kuckusuhr fungiert und zu gegebener Zeit mit Sounds und […]